
Patio Snow Melting Heating: Layers Beneath the Paving
How a snow-melting heating layer sits under interlocking pavers to keep a patio or driveway clear in winter.
An unheated driveway or patio is a hazard as soon as the temperature hovers around zero. The fix that works without shovelling or spreading salt is a heating layer buried in the build-up, right under the paving. This case walks through patio snow melting heating and how the layers sit together so a terrace or access path stays clear all winter.
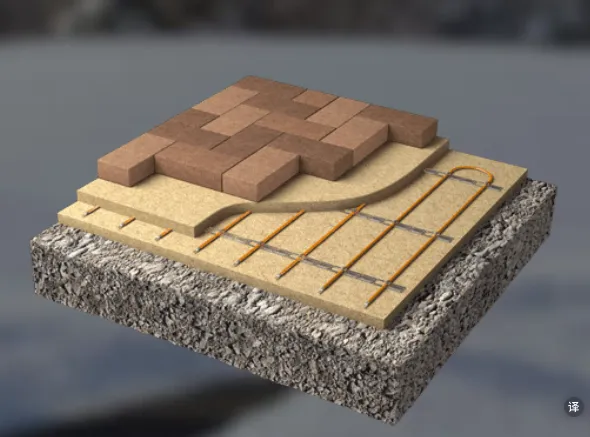
What the cross-section shows
Reading from the bottom up: a compacted base carries the whole load; an insulated heating bed holds the elements; a thin level evens the surface; and the interlocking pavers sit on top. The heating layer sits in the bed where it can heat the paving above it — and the insulation below it stops that heat leaking into the ground instead of melting snow.
For outdoor work, the heating layer needs to tolerate moisture and temperature swings. Our snow melting heating mat is built for this role, with a tough jacket for burial under paving, driveway or steps.
Sizing a real outdoor area
The “250–300 W/m²” figure is only useful with a worked example, so here is one. Say a terrace is 40 m² and you want it clear of snow and ice in winter. At a design figure of 280 W/m², the installed load is 40 × 280 ≈ 11.2 kW. That is a serious circuit, so it is split — typically into two or three runs, each with its own controller and each protected by its own residual current device. The sensor sits in the middle of the paved area where it sees the real surface, not under the eaves where rain never falls.
The wattage per square metre is chosen from the climate and the surface. A sheltered patio facing south in a mild winter needs less than a north-facing driveway that gets the wind and the shade. Getting that number right is what separates a terrace that clears quickly from one that struggles in a heavy storm — and it is exactly why we ask for the paved area and the local climate rather than quoting a one-size figure. Where snow and ice are a recurring safety risk rather than an occasional nuisance, erring toward the upper part of the range is usually the right call, because the extra watts are cheap compared with a fall on a slippery step.
How the snow/ice sensor decides
The sensor is what makes outdoor heating economical, so it is worth understanding its logic. It detects two conditions at the surface — moisture and low temperature — and only energises the heating when both are true. In a cold but dry spell it stays off, which is where the running cost is saved compared with a timer. When wet snow begins, the sensor turns the system on and it keeps heating until the surface reads clear again, then switches off. The practical effect is that the system works only as hard as the weather, which is the difference between a utility bill you dread and one you barely notice.
Building the layers, bottom to top
Compact the base
A well-drained, compacted base stops settlement that would stress the heating layer above. Get this right before anything else.
Lay the insulation bed
A rigid board beneath the elements keeps the heat going up into the pavers instead of down into the ground — this is what makes the system economical.
Run the heating layer
Lay the mat or film in neat runs, keeping the stated spacing so the surface heats evenly across the whole area.
Level and pave over
A sand or thin level bed goes over the heating layer, then the interlocking pavers are laid and bedded on top.
Wire the control
Connect to a thermostat or snow/ice sensor so the system switches on when moisture and cold are present, not on a blind timer.
Where the system pays off
Keep the approach and parking strip clear so cars move freely on frosty mornings.
Focus heating on the slip-risk surfaces — steps, ramps, thresholds — where falls happen.
Keep an outdoor entertaining area usable year-round instead of storing ice until spring.
For businesses, keep delivery bays and walkways safe without salt residue tracking indoors.
Why each layer matters
The cross-section looks simple — base, insulation, heating, level, pavers — but every layer is there for a reason, and skipping one changes the whole behaviour. The compacted base carries the traffic load and stops settlement; without it, movement above would strain the heating layer and crack the paving. The insulation board is the economics: it pushes the heat upward into the pavers instead of letting it leak into the ground, and on a ground-level patio it is the single biggest efficiency lever. The heating layer itself must sit flat in its bed, held at the designed spacing so the whole surface heats evenly rather than in hot strips. The thin level bed protects the elements and evens the paver surface. And the interlocking pavers on top are the walking surface — chosen for the load they will carry, bedded so they do not rock and pinch the heating below. Read that way, the drawing is not just a stack of materials; it is the load path, the thermal path and the durability plan in one picture, and each layer is sized to the next rather than chosen in isolation.
What running an outdoor system costs
The fear with snow melting is a huge bill, and it is usually misplaced — provided the sensor does the work. An 11.2 kW terrace sounds expensive until you remember it runs only when it is cold and wet, and only until the surface clears. Multiply the wattage by the hours it actually operates, divide by a thousand for kilowatt-hours, and apply the local rate: a system that runs a few hours on the days it snows costs a small fraction of the “always on” figure people imagine. That is the whole point of the moisture-plus-temperature sensor, and why we never recommend running outdoor heating on a bare timer.
Cable, mat or film outdoors?
Outdoor work has its own product logic, and it is worth spelling out so the right choice is made before the ground is opened. The common options are:
| Snow melting mat | Heating cable | Indoor film (not for outdoor) | |
|---|---|---|---|
| Jacket | Robust, moisture-resistant, made for burial | Jacketed, laid on a mesh or in a bed | Designed for dry indoor finishes |
| Best for | Patio, driveway, steps — even coverage | Irregular or heavily shaped areas | — |
| Wattage class | Outdoor-rated 250–300 W/m² | Sized per linear metre to the same output | Indoor 130–180 W/m², too low |
| Verdict outdoors | Recommended | Workable, more layout care | Not suitable — moisture and output |
The honest takeaway: for a clean rectangular patio or a straightforward driveway, an outdoor-rated snow melting mat gives even coverage and the fastest install. For awkward shapes with many corners and obstructions, a heating cable laid to a pattern may fit better — both at the higher outdoor wattage. Indoor-only film, however excellent in a room, is neither rated for burial nor powerful enough for snow, and using it outdoors is the kind of short-cut that fails in the first season. Keeping the two worlds separate is part of sizing honestly.
Control is the difference between smart and wasteful
Outdoor heating should not run on a schedule alone. A thermostat with a snow/ice sensor switches the system on only when the surface actually needs it — cold plus moisture — and off again when the area is clear. That single choice typically cuts winter running time dramatically compared with a timer that heats through dry cold spells. Pair the system with our thermostat range and size the controller for the full outdoor load.
Electrical sizing and safety for a buried circuit
An outdoor heating run deserves the same care as a supply that will sit outdoors for decades. Size each controller and its circuit from the paved area’s wattage, split large areas into multiple protected runs, and give every run its own residual current device with a rating suited to outdoor exposure. Bury the supply cable in conduit to a depth that local code specifies, and make sure the sensor cable runs in its own channel so a future repair does not dig up the heating layer. Outdoor circuits are the one place we never take short-cuts: the elements are buried, the exposure is harsh, and a fault that trips the RCD in January is a winter problem nobody wants.
Outdoor heating questions
Can the heating layer really sit outside all year?
Do I need insulation if the patio is over a heated space?
How does a snow/ice sensor know to switch on?
Can it melt heavy snow fast enough?
Can I add the heating to an existing paved patio?
What happens when the sensor gets snow-covered?
Do I still need to clear heavy drifts manually?
Seasonal checks worth doing
- Test the residual current device before the first cold spell, exactly as you would on any outdoor electrical circuit.
- Clear leaves and debris from the paved surface so the sensor reads the pavement, not a wet leaf blanket.
- Verify the sensor is still bonded to the paver surface and not lifted by frost or traffic.
- Confirm the controller is on the sensor-and-temperature setting before winter, not left on a manual override from the previous season.
Outdoor systems fail most often on the details a five-minute autumn check would catch: a lifted sensor, a controller left in manual, an RCD that trips the whole run. Walk the surface, press the test button, and let the sensor do its job — that routine keeps a terrace safe for many winters, and it is cheaper than a single slip on a step you assumed was clear.
Send the paved area in square metres, surface type and climate — we will suggest a mat layout and controller.
Outdoor heating design and electrical work must follow local codes and be done by a qualified installer. The cross-section is an explanatory diagram of the build-up used on site.